Kamal App Deployment Tool
Kamal is a simple, dedicated orchestration tool built specifically for deploying containerized applications (mainly Rails). In this blog post, I will take a deep dive into the internal workings of Kamal, exploring its high-level architecture and key deployment phases.
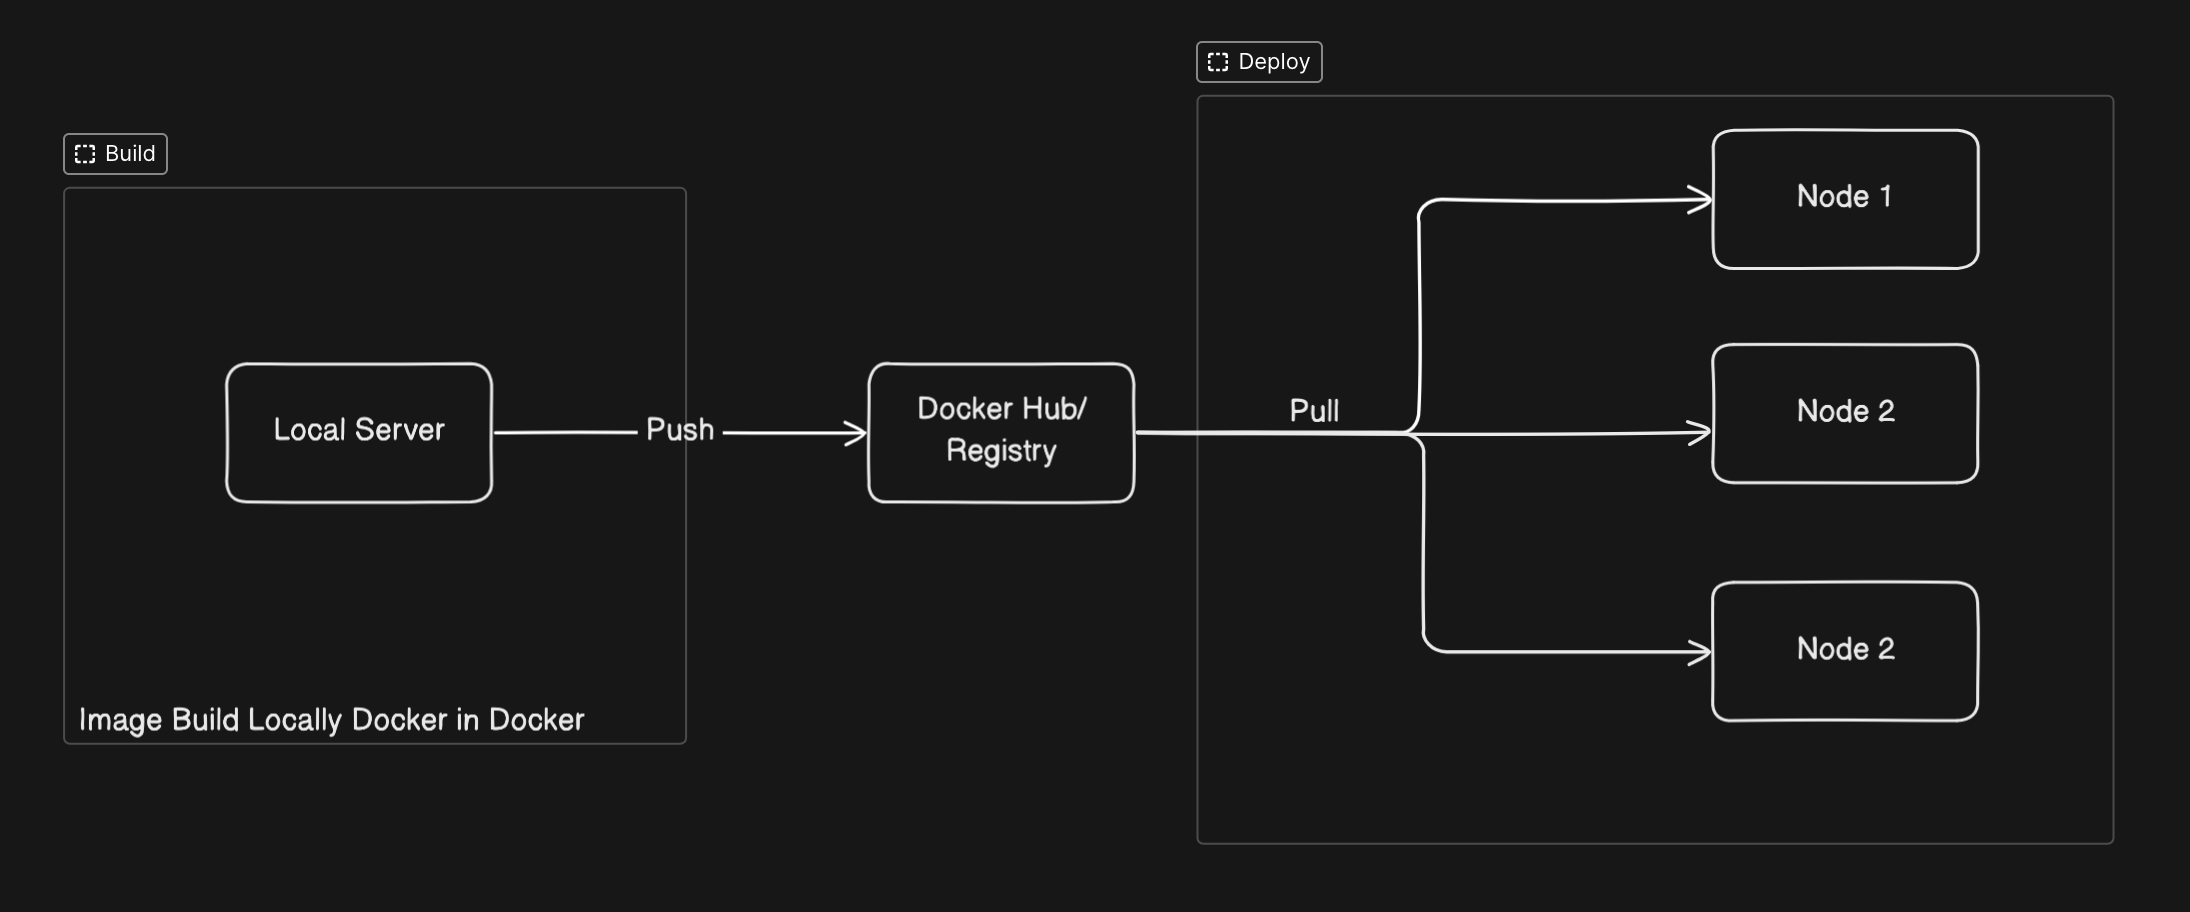
High Level Architecture of Kamal
We can divide Kamal deployment in 3 parts
- Build
- Push Image to container registry
- Deploy

Build Phase
The build process can occur either locally or on a remote server. Its primary purpose is to create images compatible with both amd64 and arm64 architectures. Kamal employs a straightforward Docker-in-Docker strategy for cross-platform builds, making it seamless to create images that work across different architectures.
Container Registry
When using kamal build command, the tool automatically pushes the newly built image to your container registry. If you’re handling the build process separately, you’ll need to manage the registry push manually. Kamal supports most major container registries out of the box (e.g. Docker hub / AWS ECR).
Deploy Phase: The Core Magic
This is the core of Kamal’s deployment process, which goes beyond just pulling the image and starting a container. Here’s a step by step breakdown of what Kamal does under the hood during deployment:
- SSH into servers & start by removing any outdated image with the same tag on each server, ensuring the environment is clean.
- Then, it pulls the latest version of the Docker image from the registry
- Kamal integrates with Kamal-proxy (or similar proxies) to manage network routing. It checks if the kamal-proxy is active, which is essential for rerouting traffic to the new container when it’s ready.
- Kamal Now, first replaces the old container name to
_replacedthan start this new primary container & will wait for healthcheck to be passed to consider it as healthy. - Once the above step completed Kamal starts the secondary containers.
- After confirming that the new containers are stable, Kamal prunes old containers and images, freeing up disk space and reducing clutter on servers. This cleanup ensures efficient resource use over time.

Practical Uses
Kamal can be used in multiple ways -
- As a cross platform image builder.
- For deploying pre-built containerized applications (Build step can be taken care by someone else).
- Deploy step can be done for any containerized application.
- Platform specific deployment to multiple nodes in parallel.
- As an end-to-end solution handling both build and deploy phases.
Prerequisites to use Kamal
- Ruby Environment.
- A containerized application.
- Access to container registry.
- Server Infrastructure (Bare Metal / EC2 / Google Cloud )
- SSH Keys Setup so that kamal can access the servers during deploy.
Steps
- Install latest ruby
- Initialize kamal
- Install kamal gem.
gem install kamal - In app directory run
kamal init(This can be run outside of project directory if build is not part of the deployment)
- Install kamal gem.
- Configure deployment settings in
config/deploy.yml - For multiple environments, create specific config files(e.g. staging / UAT / production)
config/deploy.staging.yml
config/deploy.production.yml
Build Configuration
Kamal offers flexible options for managing the build process.
- Within same project folder using
config/deploy.yml
builder:
arch: amd64- Specify external project locations, if
config/deploy.ymlis in different folder:
builder:
    arch: amd64
    context: 'path_to_project_base'
    dockerfile: 'path_to_dockerfile'
    args:
      COMMIT_SHA: 1.0.0 # default it picks up the latest commit hash.
Image Tagging
By default, Kamal uses Git commit hashes for image tagging. This provides automatic versioning based on your Git history. However, you can customize this behavior if you want to create your own tags:
builder:
  # Other configurations...
  args:
    # Override default git hash-based tag
    COMMIT_SHA: 1.0.0
Once configuration are set use kamal build to finish up the build process.
To deploy a specific version we need to pass VERSION during deploy
VERSION=1.0.0 kamal deploy -PDeploy configurations
Kamal gives us following commands to deploy application -
kamal setup    # First-time setup and deployment
kamal deploy   # Standard deployment
kamal redeploy # Just Deploy without bootstrapping servers / proxy containers
Pro Tip: Add -P or --skip-push to any command to skip the build and push phases. This is particularly useful when you’re using a separate CI/CD pipeline for building images:
kamal deploy -P # Deploy without image build & push stepManaging Database Migrations
We can use following approaches to run the migrations so that migrations runs only in primary server.
Using Hooks
Hooks are Kamal’s way of executing commands at specific points in the deployment process. Here’s the complete hooks list.
docker-setup
pre-connect
pre-build
pre-deploy
post-deploy
pre-proxy-reboot
post-proxy-reboot
For migrations, the pre_deploy hook can be used, insert the below code in hooks/pre-delploy file:
VERSION=$KAMAL_VERSION kamal app exec -p "./bin/rails db:prepare"Server Tags for Migration Control
To run migrations using server tags we can do following steps
- Add a tag to the server
- Create Env variable for that tag
- Use that ENV variable in docker-entrypoint
config.yml
servers:
  - 172.0.0.1: db
  - 172.0.0.2
  - 172.0.0.3

env:
  clear:
    MYSQL_USER: app
  secret:
    - MYSQL_PASSWORD
  tags:
    db:
      MIGRATION: 1
if [ "$RUN_MIGRATIONS" = "1" ]; then
echo "Running database migrations..."
bundle exec rails db:migrate
fiFor Detailed discussion on Database migration visit Github Discussion